This feature is for Premium subscribers only.
Trackops has integrated with Zapier, a leading application automation platform. Zapier allows customers to utilize the Trackops API to quickly and easily push data into other Zapier connected applications without the need for any technical expertise or costly developers.
What Types of Apps Can I Integrate with?
Take a look at some of the common use cases for Trackops / Zapier integrations:
- Transfer invoices and payments from Trackops into invoicing software like Quickbooks Online or Xero.
- Newly created events and tasks in Trackops automatically created in Google Calendar.
- Automatically add new client contacts in Trackops to mailing lists through MailChimp, Constant Contact, or Campaign Monitor.
- Send a welcome email through Gmail when a new client contact and/or staff member is created in Trackops.
- Update a Google Sheet each time a new case is created in Trackops.
- Copy new expense entries into Harvest, or add them as new rows in an existing Google Sheet.
- Push new clients from Trackops into CRM software like Salesforce, Highrise, or Pipedrive.
- Generate custom ad-hoc reports from your raw Trackops data through reporting software like ZoHo Reports or QuickBase.
- ... and hundreds more.
If you're ready to get started, continue reading below for more information on how to integrate Trackops with your favorite applications using Zapier.
Step 1: Enable your Trackops API
Before you can get started, you must first enable your Trackops API and get an API token.
Important: Do not share your API token with untrusted individuals, or send it via email. Your API token grants unrestricted access to your data, and should be treated like a sensitive password.
Step 2: Connect to the Trackops / Zapier Integration
Now that you have your Trackops API token, you can continue to activate your Trackops / Zapier integration using the following link:
https://zapier.com/developer/public-invite/95969/2badf4cfa313bc7e4ec953b03794e5ef/
If you do not already have a Zapier account, you will be prompted to create a new account during this process. Once you've completed the signup process, you will be ready to create your first "Zap".
Step 3: Create a new Zap using the Trackops App
Once you've successfully logged into your Zapier account, you can now create a new zap to setup your first integration. To get started, click the Make a Zap! link at the top of the Zapier dashboard. From here, start by choosing Trackops from the trigger app drop down.
Next, choose the appropriate trigger (e.g. New API Webhook) and the application and action you wish to connect with. Once you've got both your trigger and actions selected, click Continue.
Note: For invoicing integrations, be sure to choose actions that include line items, otherwise your line items will not populate.
At the next step, you will need to choose which Trackops account you wish to link with your Zap. If you have already connected Trackops with another application through Zapier, you can simply choose the connected account by clicking the dropdown and choosing the account.
If this is your first Trackops Zap you will be prompted to connect your Trackops account to Zapier so that it can access your system data. Click the button to connect a new Trackops account to Zapier (you will only have to do this for your first Zap).
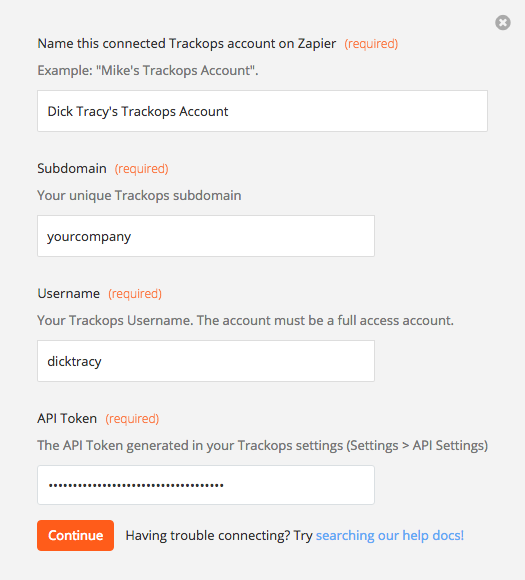
Name: A label that will identify this account. This can be whatever you want it to be.
Subdomain: This is the subdomain from your unique company url that you use to access Trackops (e.g. yourcompany.viewcases.com)
Username: This is the username that you use to login to Trackops. This must be a Full-Access account.
API Token: This is the API token that is generated when you activate your Trackops API. If you have misplaced your API Token, you will have to re-generate your token through the Trackops API Settings.
Fill out the form with your account information and click Continue when complete. If successful, the account will be saved and you will be prompted to repeat this step for the application you wish to integrate with. Repeat the process for the connected application and continue.
Zapier will now prompt you to apply any filters to the connection. In most situations you will not want to apply any filters and you can skip this step. Refer to the Zapier setup guide for more information about filters.
The final step is to match your Trackops fields with your application's required fields. For each field, click into the text box and choose the appropriate field in Trackops that matches the field you are trying to populate in your integrated application. Repeat this process until all of the required fields are populated.
Next, you will want to test your Zapier integration to make sure it behaves as you expect. To do this, click the Test Trackops Trigger button and run a test.
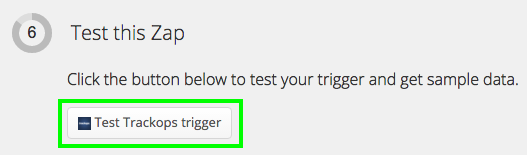
If the test succeeds, real data will have been pushed into your connected application. At this time you should login to the application and verify that the data was copied over from Trackops and looks good. If so, you are almost done!
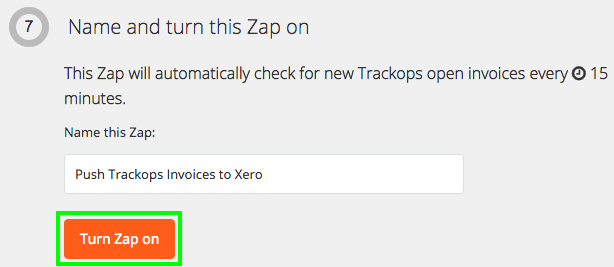
At this time, you have confirmed that your Trackops integration is working as expected, and you're ready to make it live. All you need to do is give the Zap a name (i.e. something that will help you recognize what this integration does) and then click Turn Zap on.
Congratulations, you have now successfully connected Trackops to a 3rd party application using Zapier! If you want to connect another app, just start at the top and pick a new application to connect with. It's really that simple!